SQL Server maintenance jobs
To optimize Dynamics GP performance, it is recommended to set up a SQL Server Maintenance Plan
to perform a number of maintenance and optimization tasks. The
following are the steps to create a typical SQL Server maintenance plan
for Dynamics GP. The specific steps for your plan may vary, depending on
your needs and setup.
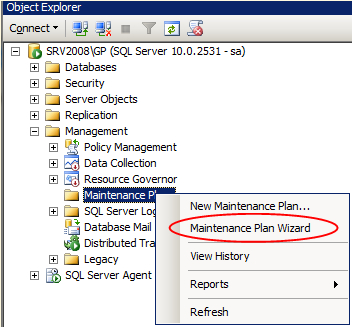
1. In SQL Server Management Studio, expand your SQL Server instance under Object Explorer, then expand the Management folder. Right-click on Maintenance Plans and select Maintenance Plan Wizard.
2. Click Next when the Maintenance Plan Wizard window comes up.
3. Give your maintenance plan a Name and a Description. Choose the Separate schedule for each task radio button and click Next.
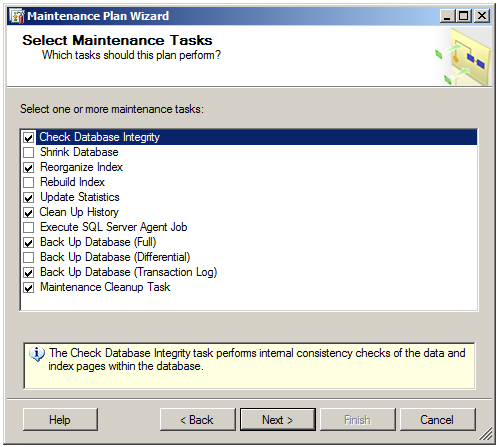
4. On the Select Maintenance Tasks window choose the tasks shown in the following screenshot:
5. Click Next and Next again on the Select Maintenance Task Order window.
6. On the Define Database Check Integrity Task window:
a. Click the drop-down next to Database(s) and select either All user
databases (this will capture all databases created in the future and
may be the better choice if you are planning on creating additional
Dynamics GP companies) or These databases, then manually select
the desired databases.
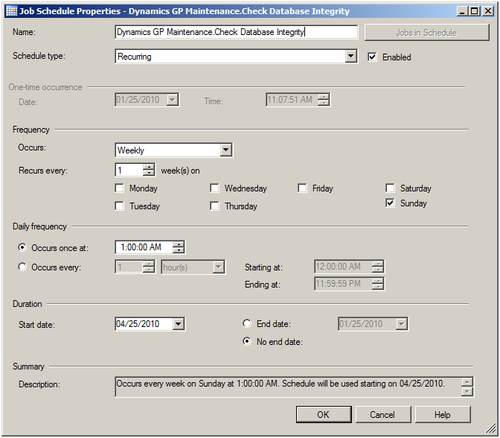
b. Click OK, then click the Change button next to Schedule. Pick the
day of the week and time that you want this part of the maintenance
plan to run. It is recommended to perform the weekly maintenance
during off hours. A typical schedule may look like the following:
c. Click OK to close the schedule window and Next to move on to the
next task.
7. On the Define Reorganize Index Task window:
a. Choose your Database(s).
b. Click Change to set the schedule for this task. It is recommended to
leave time between the tasks so that they do not overlap. How much
time to leave will depend on the specifi c setup, however usually a
gap of 30 minutes between tasks is suffi cient. This should be set as a
weekly task.
8. On the Define Update Statistics Task window:
a. Choose your Database(s).
b. Change the Schedule to make this a weekly task.
9. Historical logs for Backup and restore activity, SQL Server Agent job history, and Maintenance plan history
are all helpful for troubleshooting and maintenance. However, old logs
are typically not very helpful for current problems and it is a good
idea to delete them periodically, so that you do not keep filling your
hard drive up with unneeded data. If these logs are deemed important,
they can be part of the backup routine to be kept for the standard
retention policy of the company. On the Define History Cleanup Task window:
a. Select all the options.
b. Choose a time frame to remove historical data. A typical setting
is somewhere between one month and six months. What you
decide may depend on the plan for database maintenance in your
organization. For example, if there is a plan to have someone check
the SQL Server, logs, and jobs on a weekly basis, then keeping one or
two months of historical data should be enough..
c. Set a Schedule. Performing this task weekly is typically adequate.
d. Click Next to continue.
10. On the Define Back Up Database (Full) Task window:
a. Select your Database(s) and consider adding the master and msdb
databases to the full backups - they are handy to have if you need
to restore.
b. Choose to Create a backup file for every database.
c. Check Create a subdirectory for each database. This is an easy way
to have SQL Server automatically create a separate folder for each of
your databases. The folder names will be the names of the databases,
and SQL Server will put both the full backups and the transaction log
backups for each database in their own folder.
d. Choose a destination Folder for the backups.
e. Select Verify backup integrity.
f. Click Change to set a Schedule and click Next.
Note in the following example that even though the previous tasks were
set on weekly schedules, the full database backup is a daily task. This
is a typical and recommended schedule for full SQL Server backups of the
Dynamics GP data. However, if your backup process or disaster recovery
plan requires something different, set this to your desired frequency.
While there is no issue with taking a SQL Server database backup when
users are in the system, it is recommended to schedule backups
off-hours, especially for larger databases, to minimize impact on
performance. Also, consider having the full backup start before other
tasks, so that a database backup is performed before any other
maintenance tasks run.

11. On to the Define Back Up Database (Transaction Log) Task window:
a. Select your Database(s). Databases with the Simple recovery model
should not be chosen for transaction log backups and they will
automatically be excluded in SQL Server 2008.
b. Choose to Create a backup file for every database.
c. Check Create a subdirectory for each database. This will put the
transaction logs for each database into the same directory as the full
backups if the same destination folder is selected in the next step.
d. Choose a destination Folder for the backups.
e. Select Verify backup integrity.
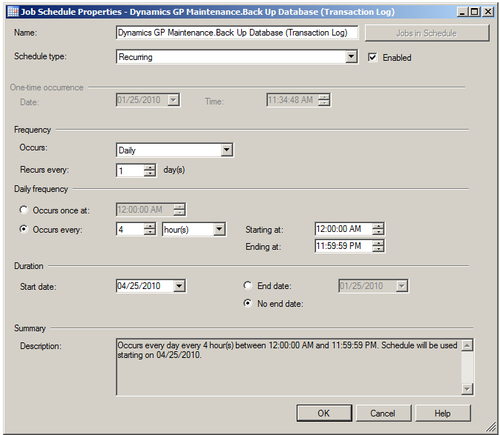
f. Set a Schedule and click Next to continue. A common schedule for
transaction log backups is every 4 hours:
12. On the Define Maintenance Cleanup Task window:
b. Choose Search folder and delete files based on extension.
c. Select the Folder you specified for your backups on the Define Back
Up Database (Full) Task window. You can use the Back button to go
back and copy/paste the folder location.
d. Enter BAK for the file extension. Note that this will create the cleanup
task for the full database backup files, but not the transaction logs. A
separate step will be required after completing the Maintenance Plan
Wizard to add a cleanup task for the transaction log backups.
e. Check Include first-level subfolders.
f. Select how long to keep the full backup fi les under File age.
Depending on space available and other considerations, many
companies usually limit this to one or two weeks.
g. Set the Schedule for this task - this should be a daily task if
databases are backed up daily.
13. On the Select Report Options window select the Folder location for the maintenance plan report and click Next.
14. On the Complete the Wizard window verify all your settings are correct. If you need to change something, use the Back button, otherwise click Finish.
15. The Maintenance Plan Wizard Progress will open, showing you the progress while the jobs for your maintenance plan are created. Once done, click Close.
16. Add an additional task to delete old transaction log backups:
a. In the SQL Server Management Studio Object Explorer expand the
Management folder.
b . Right-click on the maintenance plan you created using the steps
above and choose Modify.
c. In the list of Subplans on the right side, click on the last one.
d. From the Toolbox on the left choose Maintenance Cleanup Task
and drag it over to the window on the right.
e. Connect the two boxes representing the tasks with the green arrow:
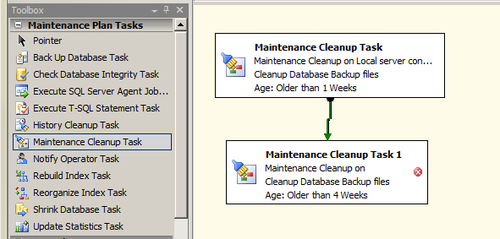
f. Double-click on the box for the new task to open the Maintenance
Cleanup Task window.
g. Choose Search folder and delete files based on extension.
h. Select the Folder you specified for your transaction log backups in
step 11d.
i. Enter TRN for the file extension.
j. Check Include first-level subfolders.
k. Select how long to keep the transaction log backups under File
age. Depending on space available and other considerations many
companies usually limit this to one or two weeks. Click OK.
l. Click Save on the Toolbar and close the maintenance plan.
You can see all the SQL Server jobs created by your maintenance plan by
expanding the SQL Server Agent folder in SQL Server Management Studio
and double-clicking the Job Activity Monitor:
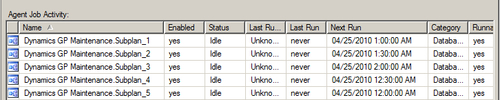
Once these steps are
completed, your Dynamics GP databases will be backed up and maintained
by SQL Server. Part of the ongoing maintenance for Dynamics GP should
include checking these jobs to make sure they are running and there are
no errors.
Backing up data
A quick recap of
the items to back up:
Now that everything is
installed, it is important to make sure that all your Dynamics GP data
is added to your regular backups so that you can confidently start
working on the Dynamics GP system setup.